SNP Genotype Imputation
If you have any questions or issues, feel free to open an issue or directly email Drew Neavin (d.neavin @ garvan.org.au)
Note
With the implementation of newer versions of the pipeline, it is important to make sure your singularity image alignes with the version of the pipeline documentation that you are currently using. To check the version of your singluation image plase run:
singularity inspect WG1-pipeline-QC_imputation.sif
which will tell you the image version you are currenlty using and, therefore, the relevant documentation for that image.
You previously prepared the files and installed the software required for the pipeline. Now we’re ready to run the SNP imputation pipeline.
Here’s an outline of the general steps that will be taken by this pipeline:

Preparing to Run the Pipeline
The first step is to copy the
PreImputation.yamlfrom the pipeline directory to a working directory and edit it based on your system, directories and setup. The contents of this file are used to pass arguments to the pipeline.There are only five parameters that need user input:
ref_dir: the directory to the 1000G hg38 reference that you downloaded in the Reference section
singularity_image: path to the singularity image
plink_dir: directory to your reference SNP genotype plink2 files
bind_paths: the paths to use to bind for the singularity image. Singularity needs this to mount all the files and directories under that path to be able to find and call required files. You can use more than one path, just separate them by a comma.
output_dir: the directory where you want to write all the files to. Make sure this directory exists before running snakemake.
The other parameters are used for specific rules to indicate memory or threads for each command. Hopefully, you shouldn’t need to edit any of these but if you are running out of memory for a specific rule, you can change them in this file.
Before running Snakemake, let’s define some variables that will make it easier and cleaner to run.
Let’s define a variable,
$IMPUTATION_SNAKEFILEwhich is the location of the snakefile which is in the cloned github repository. Change the path based on where the file is on your system:IMPUTATION_SNAKEFILE=/path/to/WG1-pipeline-QC/Snakefile
Let’s also define a variable for the location of the edited configuration yaml. Change the path based on where the file is on your system:
IMPUTATION_CONFIG=/path/to/edited/PreImputation.yaml
Finally, let’s define a location that we would like to keep the cluster log outputs and make the directory. Change the path based on where you want log files to be written.
LOG=/path/to/cluster/log_dir
mkdir -p $LOG
Important
If you log out of the cluster and log back in to run more jobs, you will have to redefine each of those variables.
We recommend keeping the commands in a file that can easily be used to define each variable or putting them in a file that you can source before running Snakemake each time
Running the Pipeline - Phase 1
Now we have all the pieces that we need to run the pipeline. This Snakemake pipeline is built to run all the SNP genotype imputation pre-processing steps that are necessary. However, there is one step that needs user input on potential discrepancies between recorded sexes and ancestries compared to the SNP-predicted sexes and ancestries. Therefore, we will have to submit the pipeline twice. So let’s start get started with the first part.
This example will use the test dataset that was provided with the Singularity image which you can get using the Data part of the Required Software section.
First, let’s do a “dry run” to identify what jobs will be run (remember to activate you snakemake environment before running:
conda activate wg1_snakemake):snakemake \ --snakefile $IMPUTATION_SNAKEFILE \ --configfile $IMPUTATION_CONFIG \ --dryrun \ --cores 1 \ --reason
The result should show you all the jobs that snakemake will run:

Next we can check how each of these jobs relates to one another:
snakemake \ --snakefile $IMPUTATION_SNAKEFILE \ --configfile $IMPUTATION_CONFIG \ --dag | \ dot -Tsvg \ > dag1.svg
The resulting image will be saved to your current directory:

Next, let’s run those jobs:
Important
You will likely need to change the cluster command dependent on your job submission platform. This example is the job submission command for an SGE cluster. Some other submission examples for SLURM, LSF and SGE clusters are available in Additional Resources.
One of the rules (
final_pruning) requires OpenBLAS variables to be set when running from a conda environment. You may want to set these before running or if you receive segmentation faults for that rule. Instructions to do so can be found in the Common Errors and How to Fix Them Section.nohup \ snakemake \ --snakefile $IMPUTATION_SNAKEFILE \ --configfile $IMPUTATION_CONFIG \ --rerun-incomplete \ --jobs 20 \ --use-singularity \ --restart-times 2 \ --keep-going \ --cluster \ "qsub -S /bin/bash \ -q short.q \ -r yes \ -pe smp {threads} \ -l tmp_requested={resources.disk_per_thread_gb}G \ -l mem_requested={resources.mem_per_thread_gb}G \ -e $LOG \ -o $LOG \ -j y \ -V" \ > $LOG/nohup_`date +%Y-%m-%d.%H:%M:%S`.log &
These first 10 steps shouldn’t take too long to run. For our example dataset with 15 individuals, it should take about 8 minutes.
Running the Pipeline - Manual Selections
So far the pipeline ran a few QC steps and checked to see if the user reported information matches the SNP-based predictions for sex and ancestry.
You should have the following results folder structure:
results/
├── check_sex
├── common_snps
├── indiv_missingness
├── pca_projection
└── pca_sex_checks
Now comes the part where we need to get your input. The pca_sex_checks directory will have files that will contain any discrepancies between the reported and SNP-predicted sex and ancestry.
Let’s first look at the sex prediction discrepancy:
Our
check_sex_update_remove.tsvfile has one individual with non-matching information - we provided that the sex of this individual was male (1) but the SNP-based prediction was female (2):#FID
IID
PEDSEX
SNPSEX
STATUS
F
UPDATE/REMOVE/KEEP
113
113
2
1
PROBLEM
0.9736
You have three options for how to deal with each of the samples that have mismatching sex information: +
UPDATEwill update the assignment to the SNP-predicted decision +REMOVEwill remove the individual from downstream analysis +KEEPwill keep the original manually-reported assignmentUpon checking our records, we can see that this was a manual entry mistake and we will update to the SNP-predicted sex. So we type
UPDATEint theUPDATE/REMOVE/KEEPcolumn of thecheck_sex_update_remove.tsvfile:#FID
IID
PEDSEX
SNPSEX
STATUS
F
UPDATE/REMOVE/KEEP
113
113
2
1
PROBLEM
0.9736
UPDATE
Let’s next move on to the discrepancies between the user-provided and SNP-predicted ancestries.
The
ancestry_update_remove.tsvfile in thepca_sex_checksdirectory has one individual with non-matching information - we provided that the ancestry of the individual was South Asian (SAS) and the SNP-predicted ancestry was European (EUR). There is also an empty field for our decision to be entered:#FID
IID
PAT
MAT
SEX
Provided_Ancestry
PCA_Assignment
UPDATE/REMOVE/KEEP
349
350
0
0
1
SAS
EUR
There is also a figure that demonstrates where each of the individuals from the vcf file sit within the 1000G reference PCA space. The left panel has all the individuals from the 1000G reference colored by ancestry, the middle panel has the individuals from our dataset colored by the predicted ancestry and the right panel has the individuals from our dataset colored by whether the provided and predicted ancestries match:

The individual who was recorded as SAS but was predicted to be from EUR ancestry is colored in maroon on the right panel. Since the individual is similar to the EUR ancestry cluster from 1000G, we want to update this individual to the SNP-predicted ancestry so we will type
UPDATEin theUPDATE/REMOVE/KEEPcolumn:#FID
IID
PAT
MAT
SEX
Provided_Ancestry
PCA_Assignment
UPDATE/REMOVE/KEEP
349
350
0
0
1
SAS
EUR
UPDATE
Running the Pipeline - Final Run
Now that we have provided the manual information that is required, we can run the rest of the pipeline which will 1) update the variant locations to the hg38 reference, 2) filter for high quality variants and individuals, 3) phase the data, 4) impute the data and 5) do some post-imputation processing of the results.
Let’s first do another dry run which will start an interactive prompt to see what ancestral populations you want to impute and what minor allele frequency you would like to use for that population.
snakemake \
    --snakefile $IMPUTATION_SNAKEFILE \
    --configfile $IMPUTATION_CONFIG \
    --dryrun \
    --cores 1 \
    --reason
You should be entered into an interactive prompt. With the test dataset, it looks like this:
You have 14 individuals from EUR ancestry. Would you like to impute for this ancestral population? (yes/no)
Then you need to answer if you want that ancestral population to undergo imputation. In our case, we answer
yesand it provides another prompt:What minor allele frequency filtering would you like to use for the pre-imoutation processing for the EUR ancestry group. A value of 0.05 removes SNPs with < 5% minor alleles from the analysis. For no filtering use 0. (0-1)
In our case, we enter
0since we have a small sample size and don't want to overfilter the data too much before imputation. Most groups will have much larger samples sizes so we anticipate 0.03 (3%) to 0.05 (5%) to be the most frequently used thresholds.Important
If you didn’t fill out your
check_sex_update_remove.tsvandancestry_update_remove.tsvfiles correctly, you will get an error message and the pipeline won’t run until you provide the correct input files. You will receive the following message:The column names of your psam file are not correct. They should be: '#FID', 'IID', 'PAT', 'MAT', 'SEX', 'Provided_Ancestry','genotyping_platform', 'array_available', 'wgs_available','wes_available', 'age', 'age_range', 'Study'. If the names look the same, check that the file is tab separated, without any spaces or other weird characters. Exiting.
After the manual entries, you should see the following jobs will be run by the pipeline:

Note
Your responses to the manual entry steps are saved to a file to be used downstream. If you made an error in the manual entry or want to change your responses, you can either edit the file directly or delete it and run the dryrun command again to enter new answers.
The file is located at results/pca_sex_checks/ancestry_mafs.tsv
Let’s also take a look at how those new jobs fit in with the steps that we already ran:
snakemake \ --snakefile $IMPUTATION_SNAKEFILE \ --configfile $IMPUTATION_CONFIG \ --dag | \ dot -Tsvg \ > dag2.svg
The resulting image will show jobs that are completed in dashed lines and those that still need to be run in solid lines. This will be saved to your current directory. It’s quite a busy image so you can open it here if you want to take a look at it.
Next, let’s run those new jobs:
Note
Remember that you may need to change the cluster command dependent on your job submission platform. This example is the job submission command for an SGE cluster.
nohup \
  snakemake \
    --snakefile $IMPUTATION_SNAKEFILE \
    --configfile $IMPUTATION_CONFIG \
    --rerun-incomplete \
    --jobs 20 \
    --use-singularity \
    --restart-times 2 \
    --keep-going \
    --cluster \
        "qsub -S /bin/bash \
        -q short.q \
        -r yes \
        -pe smp {threads} \
        -l tmp_requested={resources.disk_per_thread_gb}G \
        -l mem_requested={resources.mem_per_thread_gb}G \
        -e $LOG \
        -o $LOG \
        -j y \
        -V" \
  > $LOG/nohup_`date +%Y-%m-%d.%H:%M:%S`.log &
Note
Some HPCs have java memory options preset which may interfere with some jobs and cause them to fail (specifically the
harmonize_hg38rule). See the Common Errors and How to Fix Them Section section for a way to fix this.Finally, let’s create a report that includes all of our results and some pipeline metrics:
nohup \
  snakemake \
    --snakefile $IMPUTATION_SNAKEFILE \
    --configfile $IMPUTATION_CONFIG \
    --report imputation_report.html
Results!
After running those jobs, you should be done!
You should have the following results directories:
results/
├── check_sex
├── common_snps
├── crossmapped
├── crossmapped_sorted
├── eagle_prephasing
├── filter_preimpute_vcf
├── genotype_donor_annotation
├── harmonize_hg38
├── het
├── het_filter
├── indiv_missingness
├── minimac_imputed
├── pca_projection
├── pca_sex_checks
├── separate_indivs
├── split_by_chr
├── subset_ancestry
├── update_sex_ancestry
├── vcf_4_demultiplex
├── vcf_all_merged
├── vcf_fixref_hg38
└── vcf_merged_by_ancestries
The
genotype_donor_annotation.tsvhas been formatted to be used by WG3 for eQTL detectionThe files in
vcf_4_demultiplexwill be input for the next step - Demultiplexing and Doublet RemovalThe files in
vcf_merged_by_ancestriesandvcf_all_mergedwill likely be used (after further processing) for eQTL detection by WG3
You will also have an html report that includes figures and pipeline metrics called imputation_report.html.
The report generated for this test dataset is available here.
This report will have three main figure subsets:
Ancestry PCS figure (already shown for ancestry decisions) are in the
Ancestry. The left panel has all the individuals from the 1000G reference colored by ancestry, the middle panel has the individuals from our dataset colored by the predicted ancestry and the right panel has the individuals from our dataset colored by whether the provided and predicted ancestries match:
A summary of the provided ancestries, the final ancestry classifications and the decisions that were taken for non-matching ancestry annotations are in the
Ancestry and Sex Summary.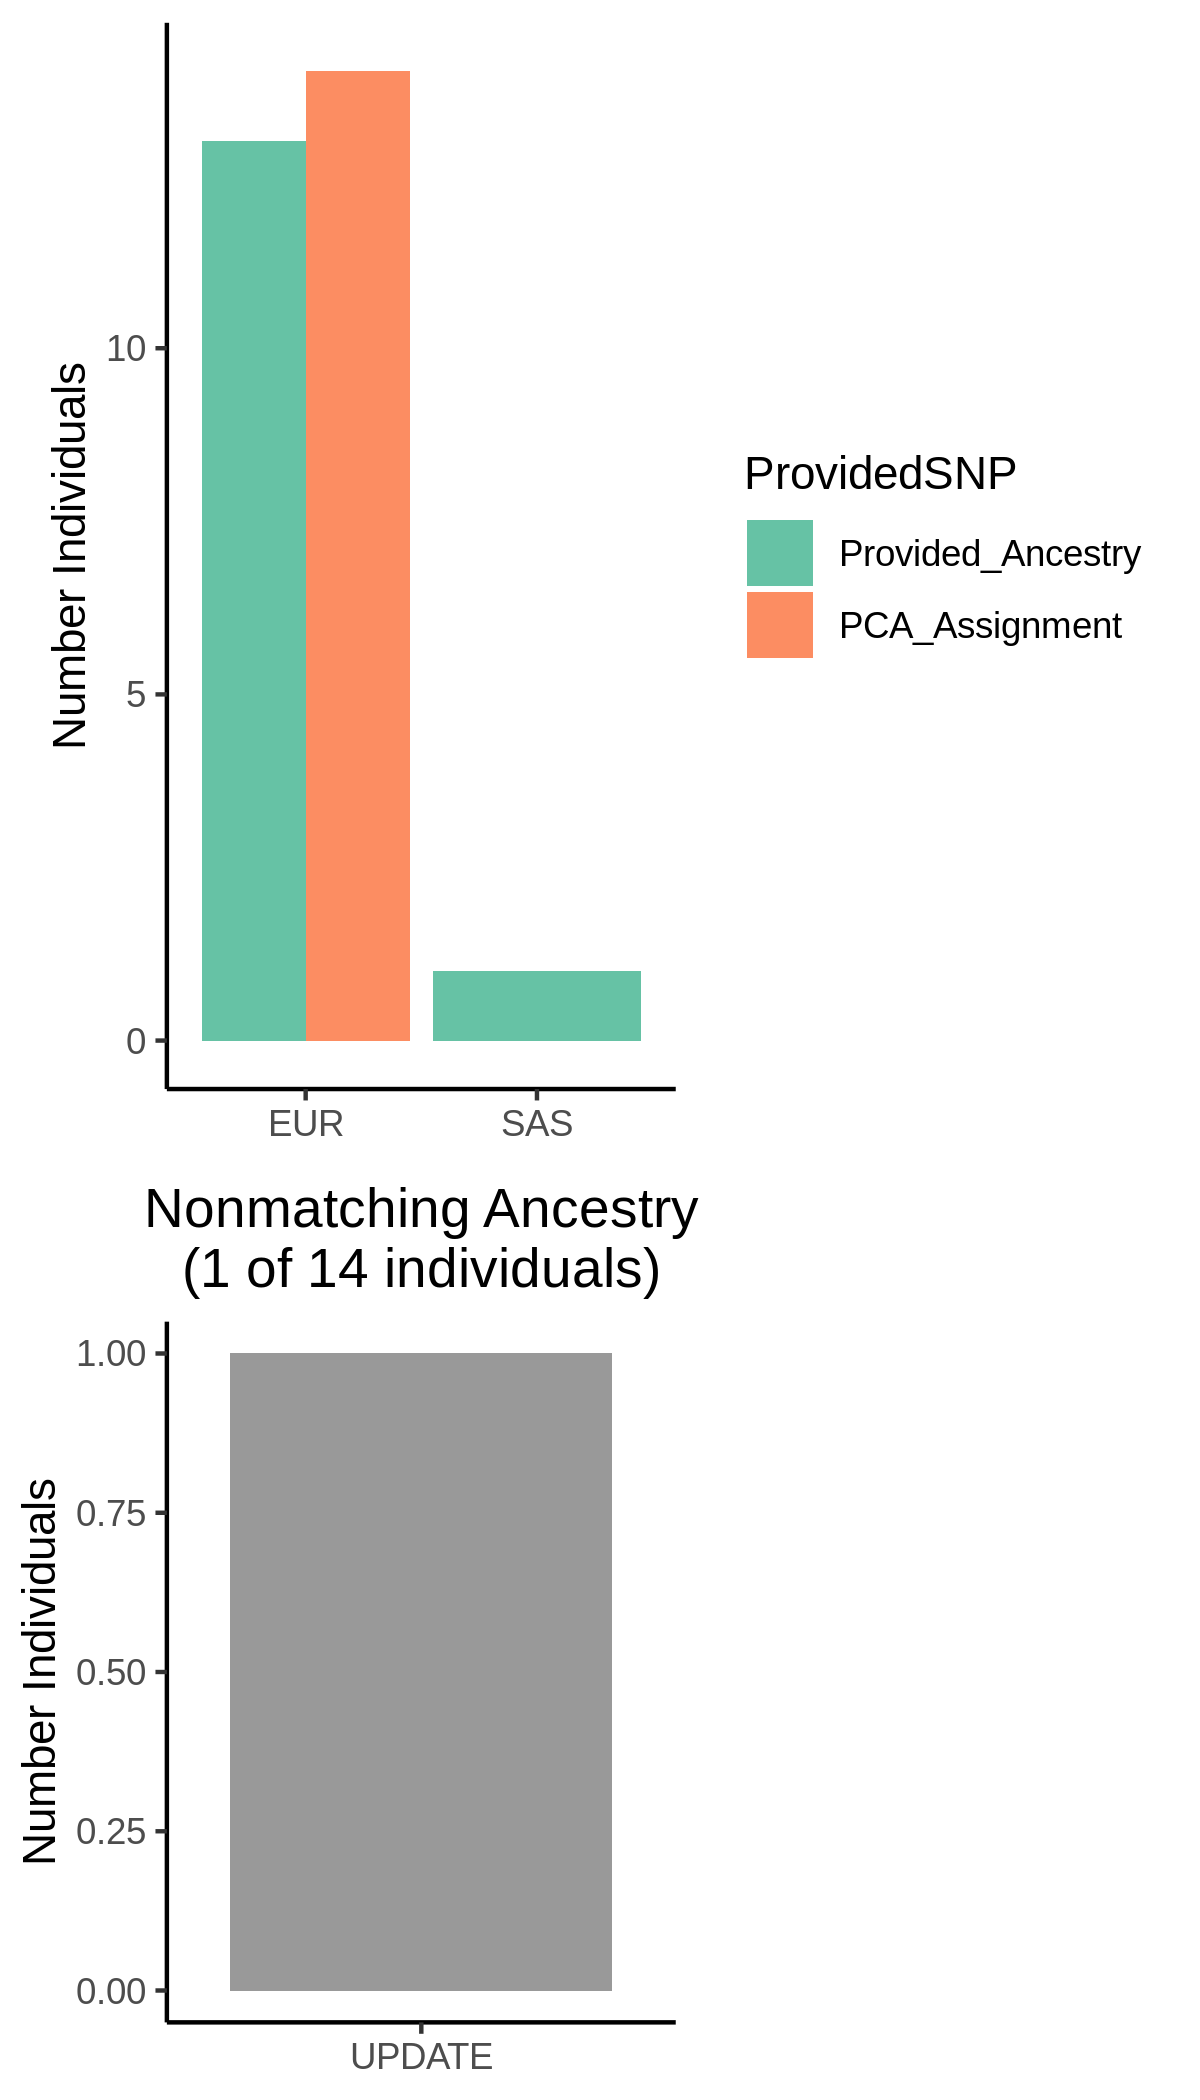
A summary of the provided ancestries, the final sex classifications and the decisions that were taken for non-matching sex annotations are in the
Ancestry and Sex Summary.
A summary of the number of SNPs identified after imputation per ancestry, for combined ancestries and after filtering are in the
Ancestry and Sex Summary.
Uploading Data
Upon completing the SNP Imputation pipeline, please contact Marc Jan Bonder at bondermj @ gmail.com to get a link to upload the imputation_report.html and the genotype_donor_annotation.tsv
Be sure to include your dataset name as well as the PI name associated to the dataset.
This link will also be used for data upload at the end of the demultiplexing and doublet removal pipeline, QC images and WG2 results.
Important
Please note you can’t change filenames after uploading!
Next Steps
🎉 Congrats! 🎉 You have successfully completed the first step for the sceQTL-Gen Consortium. Now you can move on to Demultiplexing and Doublet Removal.